Check Controls evaluates ladders, controls, and QA profiles to determine if they are within established parameters. This guide explains how to check the controls and how to change the control settings.
Start Checking Controls
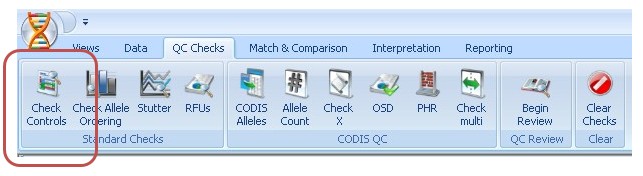
Click on the "Check Controls" button under the QC Checks tab.
Make sure your table is open and active on the screen.
Review the Results
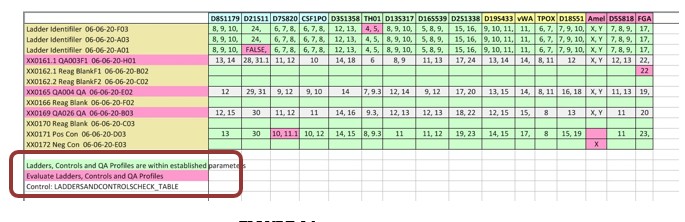
The ladders, controls, and QA profiles that are within established parameters are highlighted green. The ones that are not are highlighted pink.
Once you click on the “Check Controls” button, only the controls will appear on the table. To bring the samples back in view, either hit the F8 button (once and just the samples will be shown, twice and both samples and controls will be shown) or go back to the View tab, and click on All or Samples depending on what you want to view.
What to do if Check Controls is not picking up your controls.
Check Controls depends on the settings in the database. There are a few things in ArmedXpert that may be missing or incorrect.
- You may need a few expressions added or changed to the Control qualifiers.
- You may need to add the correct table that is used to check the controls against.
- You may need to add or correct the QA Profile used to check the QA Controls.
- You may need to change the thresholds for the Quality Controls.
Add or Change Expressions
Open up the ArmedXpert Options Window. This can be found by click on the ArmedXpert Icon on the upper left hand corner of the screen.
Click on "Quality Control" on the left side of the window.
Click on the "Ladders and Controls" tab.
The top portion has the Control qualifiers. These qualifiers enable the controls to be picked up during the quality control check. For example, .“Ladder.” will pick up any control that contains the word Ladder, no matter what characters are before or after the word.

The expressions can be changed by clicking on the Expression column in the row that you would like to change and then change to the correct expression.
Regular expressions are being used.
The easiest regular expression is the |QA which just means check for a sample with QA in the name. The pipe character is above the 'enter' key usually shift +'\' - it looks like a double line or fat semi-colon on some keyboards.

Add Control Table
NicheVision Forensics can help with you with setting the table to check controls against. We can send you a new table to use when checking controls. Please contact us for more information.
First step in selecting a new table, is to commit the table to the database.
Open the a New Ladder and Control table in ArmedXpert.
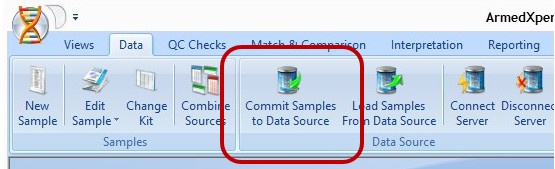
Click on the "Commit Samples to Data Source" button under the Data tab in ArmedXpert.
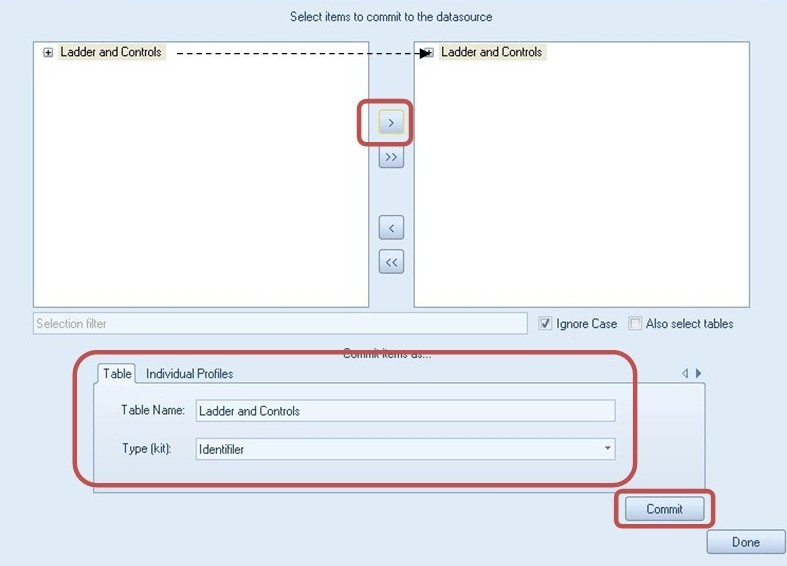
The Datasource Commit window will open. Click on the table you wish to commit, click the > button, and the table will be move to the box on the right.
The table name and Type (kit) will be filled in; you can change these if wanted.
Click on the “Commit” button
When finished with the window, hit the “Done” button to close the window.
Go back to the "Ladders and Controls" tab in the ArmedXpert Options window.
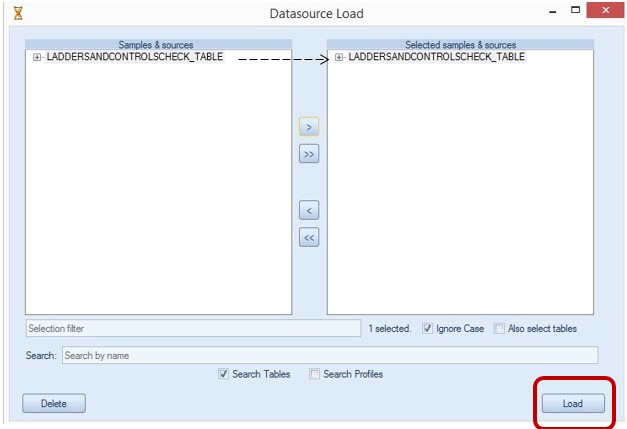
Click on the "Select Tables" button.

Click on the appropriate table on the left.
Click on the > button. The table will move to the box on the right.
Click on the “Load” button to load the table.
Commit your QA to ArmedXpert.
QA Profiles need to be added to ArmedXpert for the QA check to work. Follow the instructions found in the "How to add QA Profile for QA Control Checks" guide to either add the QA profiles to ArmedXpert or Reset your QA profile.
Change or Add Thresholds for Quality Control Checks
There are instructions for adding the Quality Control thresholds it can be found in the "How to Set up the Interpretation Quality Control Options" guide.